|
| Backgammon Variants |

Improving Backgammon Bots
Backgammon bots have been a great boon to players wanting to learn and play backgammon at the highest level. They let you practice against a world-class opponent any time you want. They let you analyze your games and have your mistakes pointed out to you. And they let you set up positions and play “what if.”
But modern bots are limited when it comes to explaining why one play is better than another. They can tell you the what but they can’t tell you why.
Sometimes the “why” is complicated; sometimes there is a unique confluence of factors that make one play right and another play wrong. But a lot of the time there is a fairly straightforward principle involved — something that we can learn from.
Wouldn’t it be wonderful to have a “Kit Woolsey bot” that would analyze a position and explain to you what is going on? That’s not likely going to happen anytime soon, but it seems to me that backgammon bots should be able do better than they do now.
One way they could be better is by reporting wastage.
Wastage
In Hyper 10, I discussed the concept of contact wastage. Contact wastage comes from pips lost either because (1) your numbers are blocked and you can’t move forward or (2) you are hit and thus have to move your checkers farther to bring them home.
The total wastage of a position is made up of 6 parts:
- Your bearoff-wastage.
- Your block-wastage.
- Your hit-wastage.
- Opponent’s bearoff-wastage.
- Opponent’s block-wastage.
- Opponent’s hit-wastage.
Knowing these wastage numbers can be quite useful in understanding a position’s basic properties. Wastage can illuminate a position’s strengths of weaknesses — what features of a position are important and how those features become more and less important over time.
Holding Game Example
Say you are playing a holding game and trying to decide when to break anchor. There are tradeoffs involved and it is not always an easy decision. Even after the bot tells you which play is correct, it might not be clear why.
But suppose the bot could show you the different wastage numbers. You could see what happens when you hold onto your anchor too long: Your bearoff-wastage climbs as you have an increasing chance of crunching. And, as your timing gets worse, you will see your opponent’s block-wastage fall as you become less and less likely to contain his checker if you hit it.
Blitz Example
Or maybe you are carrying out a blitz. A blitz will show up in the wastage numbers as you having high hit-wastage because you are taking risks to make a board and your opponent having high block-wastage because he will be stuck on the bar for several rolls if you close him out.
If your opponent’s block-wastage numbers fall, it is the first sign that the blitz may be on its last legs. At a certain point your hit-wastage becomes too high and his block-wastage too low to make it viable to continue the blitz and you will have to consider alternatives.
That’s my dream, that one day backgammon bots will display the wastage numbers along the other properties of a position. I think it would make it easier to better understand what is happening in the game.
Measuring Contact
In Hyper 09, I asked what hypergammon position has the most contact. To answer that question, we have to decide how to measure contact.
One idea I had was to look at the wastage numbers. High contact wastage mean lots of hitting and blocking, so that’s a lot of contact. I went through all the hypergammon positions to look for positions with high contact wastage. The highest was this position:
|
| Black to roll |
Here is a breakdown of the contact wastage:
| Block | Hit | Total | |
| Black: | 0.31485 | 34.73917 | 35.05402 |
| White: | 0.39993 | 82.88693 | 83.28686 |
| Total: | 0.71478 | 117.62610 | 118.34088 |
The total contact wastage is 118.34 pips and that is a lot of contact. For comparison, the contact wastage of the starting position is only 68.76 pips.
How about lowest contact position? There are many positions that have no contact at all, but we ignore those. I went through all the hypergammon contact positions, and the one with the lowest contact wastage was this:
|
| Black to roll |
| Block | Hit | Total | |
| Black: | 0.00092 | 0.01152 | 0.01244 |
| White: | 0.00023 | 0.03480 | 0.03503 |
| Total: | 0.00115 | 0.04632 | 0.04747 |
The contact wastage here is indeed very low, but if you look a little closer you will see that the position avoids contact wastage by using a little trick.
Notice what happens when black rolls 1-1. He can’t move his checker on the 20 point because it is blocked, but he has another way to play it — he can move 3/1(2) instead. Moving to the ace point is not a very productive way to play that roll. Black is essentially wasting a roll here because he has no choice; the block on white’s 6 point is in his way.
In fact, this play does have wastage. But it doesn’t show up in the contact wastage numbers; it shows up in bearoff wastage instead. The position gets the title of “lowest wastage” because of an accounting trick. So the the result isn’t very satisfying.
Another Way to Measure Contact
Thinking about this some more, I came up with another idea for measuring contact. What we really want to know is how much interference there is between the two sides in a position.
One way to see how much interference there is between the two sides is to separate the white checkers from the black checkers, so that each plays on their own board, like this:
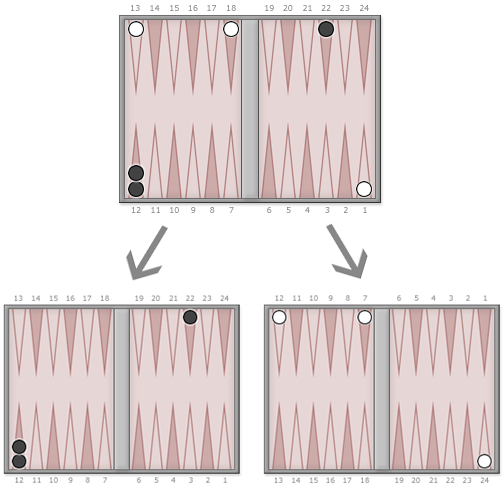
Black and white are still playing against each other, but we have removed the contact because each color is playing on its own board. Now we can compare how long a game takes when there is contact with how long it takes when there is no contact.
Let “contact rolls” be the number rolls needed to play out the game on the same board. Let “no-contact rolls” be the number of rolls needed to play out the game on separate boards. Then:
Most Contact
Using this method of measuring contact, I went through all the hypergammon positions and found that the following position has the most contact:
|
| Black to roll |
Played on separate boards, this position takes an average of 4.75137 rolls to finish. Played on one board, it takes an average of 23.59733 rolls to finish, a difference of 18.84596 rolls.
Least Contact
Then I went through all the hypergammon positions to find the one that has the least contact (among positions that have any contact at all), and this is the position I found:
|
| Black to roll |
This position has so little contact, it is hard to even think of a scenario that plays out to a different number of rolls when played on one board versus two. There is only one pair of rolls (one by black, one by white) that produce a different length game. What sequence of rolls would you need?
[Read on when you are ready to see the answer.]
The critical sequence is 1-1 followed by 6-6.
However you play, black’s 1-1 isn’t enough pips to get his checkers off this turn. Instead, black can move both of his checkers to the ace point where he is sure to get off next roll. But, when played on one board, the 1-1 hits, sending white’s checker to the bar. And that’s crucial. Once white is on the bar, not even a 6-6 is enough to win the game.
So 1-1 followed by 6-6 ends the game in two rolls when played on separate board, but takes three rolls to finish the game when played on separate boards. All of the other 46,655 two-roll sequences play out to the same number of rolls whether on one board or two. The difference, then, is 0.000772 rolls on average, and that’s the least contact possible in hypergammon.
How Long Does It Last?
How long does a game of cubeless hypergammon last? In particular:
- What it the shortest length possible for a game of hypergammon?
- What is the longest length possible for a game of hypergammon?
- What is the average length of a game of hypergammon? (I gave a little hint in Hyper 10: “It takes an average of 13.45010 rolls to bring your checkers home and bear them off.”)
- What is the median length of a game of hypergammon? (“Median” is the point at which half of all games are shorter and the other half are longer.) Would the median be the same as the average length? Or would be shorter or longer?
- What is the most common length of a game of hypergammon?
I will give the answers next time, but feel free to try to guess in the meantime.
|
|

